Till now we have seen only designing part of app. Now lets write some code.
We will write code for event on button click and display some message.
1. Create a new Project with name Android Toast
2. Set package name as com.androidcodr.toast
3. Select minimum sdk API 14.
4. Select Empty activity to add. Click finish
We will create simple login demo that will accept username and password from user and will check if its correct on button click. If correct Login successful message will be shown to user.
Add gravity:center to our root view. Here root view is RelativeLayout. If you are using newer version of android studio you may see constraintLayout.
Just replace it with RelativeLayout.

5. Add textview to layout
Set text as Login Demo
Set size 28sp
While setting text size sp is used instead dp.
Text color as #FFCC0000
Margin 10dp
Gravity to center
<TextView
android:layout_width="match_parent"
android:layout_height="wrap_content"
android:text="Login Demo"
android:gravity="center"
android:textSize="28sp"
android:textStyle="bold"
android:textColor="#FFCC0000"
android:layout_margin="10dp" />
6. Add another textview for username
<TextView
android:text="Username:"
android:layout_width="match_parent"
android:layout_height="wrap_content"
android:id="@+id/textView" />
7. Add edittext to get input from user for username
Inputtype as textCapWords
ems 10
bottom margin 20dp
id main_edittext_username
this is good habit to give id as above to avoid confusion if you have lost of activity and more contents. First part is name of activity second part is type of content third part is id/name given.
You can use short name as mainTvUser
<EditText
android:layout_width="wrap_content"
android:layout_height="wrap_content"
android:inputType="textCapWords"
android:text="" android:ems="10"
android:id="@+id/main_editText_username"
android:layout_marginBottom="20dp" />
8. Same for password
Add textview
Text Password:
<TextView
android:text="Password:"
android:layout_width="match_parent"
android:layout_height="wrap_content"
android:id="@+id/textView2" />
9. Add edittext to get input from user as password.
Inputtype textPassword.
Id main_editText_password
Bottom margin 20dp
<EditText
android:layout_width="wrap_content"
android:layout_height="wrap_content"
android:inputType="textPassword"
android:ems="10"
android:id="@+id/main_editText_password"
android:layout_marginBottom="20dp" />
10. Now add linear layout (horizontal)
Inside it add two button
Set text of first button as Login
Id main_button_login
Layout_weight as 1
Here weight is used for how much space it will use in parent layout.
Both button weight given as 1 means they will share space in equal proportion.
You can directly specify onClick method here in xml also
onClick login
means login method will be called when user click login button.
11. Set text of Second button as Clear.
Id main_button_clear.
Weight 1
We will not specify onclick method for clear button here. We will do it programmatically.
<LinearLayout
android:orientation="horizontal"
android:layout_width="match_parent"
android:layout_height="match_parent">
<Button
android:text="Login"
android:layout_width="wrap_content"
android:layout_height="wrap_content"
android:id="@+id/main_button_login"
android:layout_weight="1"
android:layout_margin="10dp" />
<Button
android:text="Clear"
android:layout_width="wrap_content"
android:layout_height="wrap_content"
android:id="@+id/main_button_clear"
android:layout_weight="1"
android:layout_margin="10dp" />
</LinearLayout>
Here if full code for activity_main.xml
<?xml version="1.0" encoding="utf-8"?>
<RelativeLayout xmlns:android="http://schemas.android.com/apk/res/android"
xmlns:tools="http://schemas.android.com/tools"
android:id="@+id/activity_main"
android:layout_width="match_parent"
android:layout_height="match_parent"
android:paddingBottom="@dimen/activity_vertical_margin"
android:paddingLeft="@dimen/activity_horizontal_margin"
android:paddingRight="@dimen/activity_horizontal_margin"
android:paddingTop="@dimen/activity_vertical_margin"
android:gravity="center"
tools:context="com.androidcodr.toast.MainActivity">
<LinearLayout
android:layout_width="wrap_content"
android:layout_height="wrap_content"
android:orientation="vertical">

<TextView
android:layout_width="match_parent"
android:layout_height="wrap_content"
android:text="Login Demo"
android:gravity="center"
android:textSize="28sp"
android:textStyle="bold"
android:textColor="#FFCC0000"
android:layout_margin="10dp" />

<TextView
android:text="Username:"
android:layout_width="match_parent"
android:layout_height="wrap_content"
android:id="@+id/textView" />

<EditText
android:layout_width="wrap_content"
android:layout_height="wrap_content"
android:inputType="textCapWords"
android:text=""
android:ems="10"
android:id="@+id/main_editText_username"
android:layout_marginBottom="20dp" />

<TextView
android:text="Password:"
android:layout_width="match_parent"
android:layout_height="wrap_content"
android:id="@+id/textView2" />

<EditText
android:layout_width="wrap_content"
android:layout_height="wrap_content"
android:inputType="textPassword"
android:ems="10"
android:id="@+id/main_editText_password"
android:layout_marginBottom="20dp" />

<LinearLayout
android:orientation="horizontal"
android:layout_width="match_parent"
android:layout_height="match_parent">

<Button
android:text="Login"
android:layout_width="wrap_content"
android:layout_height="wrap_content"
android:id="@+id/main_button_login"
android:layout_weight="1"
android:layout_margin="10dp"
android:onClick="login" />

<Button
android:text="Clear"
android:layout_width="wrap_content"
android:layout_height="wrap_content"
android:id="@+id/main_button_clear"
android:layout_weight="1"
android:layout_margin="10dp" />

</LinearLayout>
</LinearLayout>
</RelativeLayout>
Our activity is now ready Now add some code to java file.

12. You can find this MainActivity.java under java/our package path.

MainActivity look like this
At top package name is present. This identify location of java file.
Then
Imports used in java files
Then java class
Here MainActivity extends AppCompatActivity.
AppCompat is Support libray used by android studio by default to support old API.
13. You can see onCreate method is there @override from super class
setContentView (R.layout.activity_main);
activity_main is set visible here.
Here R.java class is automatically generated and it stores unique id for each resource used in app.
From windows explorer goto AndroidStudioProject check your App folder then buildgeneratedsourcerdebugcomandroidcodrtoast
Or

check directly from Android studio.
14. Declare as fields
private EditText eduser;
private EditText edpass;
private Button btnlogin;
private Button btnclear;
15. initialize it below setContent
eduser =(EditText)findViewById(R.id.main_editText_username);
edpass=(EditText)findViewById(R.id.main_editText_password);
btnlogin=(Button)findViewById(R.id.main_button_login);
btnclear=(Button)findViewById(R.id.main_button_clear);

while typing you can use autocomplete or suggestion by Android studio by pressing Ctrl plus Space key
on Windows Keyboard.
16. Now define onclick method login after onCreate method is completed.
Here is its structure. It will get View from which it is called.
public void login(View view){

}
17. its simple getText method get text from edittext use toString to convert it to string and store it in local variable .
String username=eduser.getText().toString();
String password =edpass.getText().toString();
18. We will check username equals to demo and password equals to androidcodr
if (username.equals("demo") && password.equals("androidcodr")){

}
19. if both are correct then we will display a message to user Login successful.
We will use Toast to display message.
Toast.makeText(this, “Login Successfull”, Toast.LENGTH_SHORT).show();
Here maketext method is called from Toast class to display message.
First parameter passed to it is Context
Second is message
Third is Time duration. Toast.LENGTH_SHORT means it will display for short duration.
Call show(); method to show your Toast message.
As new programmer you may forget to call show(); then it will not display Toast message.
And you will wonder what’s wrong with my code. No error No Warning still not displaying message.

20. Android studio can help you with auto completion Type Toast Press ctrl + space
You can see create a toast just press enter and your method is added.
In else block add another Toast message as Login Failed
Toast.makeText(this, “Login Failed!”, Toast.LENGTH_SHORT).show();
21. Compile and run app on emulator.

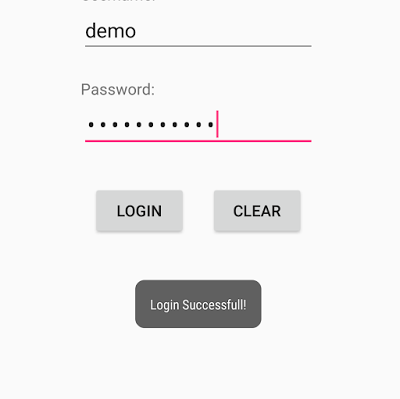
Here is our main activity
Type username as demo
Password as androidcodr
Press login button
A Toast message will displayed as Login Successful!

22. Try with different username Change username to user or anything you want.
Press login button
Toast message will be displayed as Login Failed!

23. Wait we have not added method to clear button.
Lets write code for it.
As I said earlier we have not added onClick properties for clear button in our activity_main.xml.
But still we can do it programmatically
How lets see.
24. Set onclicklisterner to clear button in onCreate method
btnclear.setOnClickListener(new View.OnClickListener() {
@Override
public void onClick(View v) {
}
});
inside onClick method just add these 2 lines.
eduser.setText("");
edpass.setText("");
simple we have set text to blank to both edittext username and password.
25. Build and Run app again.
Yes now clear button is also working.
26. We further added more code to check blank input from user by checking String isEmpty method from String class or you can check its length.
If its greater than 0 then proceed else display Toast message Please type both fields.

Here if full code of MainActivity.java
package com.androidcodr.toast;
import android.os.Bundle;
import android.support.v7.app.AppCompatActivity;
import android.view.View;
import android.widget.Button;
import android.widget.EditText;
import android.widget.Toast;

public class MainActivity extends AppCompatActivity {
private EditText eduser;
private EditText edpass;
private Button btnlogin;
private Button btnclear;

@Override
protected void onCreate(Bundle savedInstanceState) {
super.onCreate(savedInstanceState);
setContentView(R.layout.activity_main);
eduser =(EditText)findViewById(R.id.main_editText_username);
edpass=(EditText)findViewById(R.id.main_editText_password);
btnlogin=(Button)findViewById(R.id.main_button_login);
btnclear=(Button)findViewById(R.id.main_button_clear);

btnclear.setOnClickListener(new View.OnClickListener() {
@Override
public void onClick(View v) {
eduser.setText("");
edpass.setText("");
}
});
}

public void login(View view){
String username=eduser.getText().toString();
String password =edpass.getText().toString();

if (username.trim().isEmpty()|| password.trim().isEmpty()){
Toast.makeText(this, "Please Type both Fields!", Toast.LENGTH_SHORT).show();
} else {
if (username.equals("demo") && password.equals("androidcodr")){
Toast.makeText(this, "Login Successfull!", Toast.LENGTH_SHORT).show();
} else{
Toast.makeText(this, "Login Failed!", Toast.LENGTH_SHORT).show();
}
}
}
}
if you face any problem comment below.
share this tutorial with your friends.