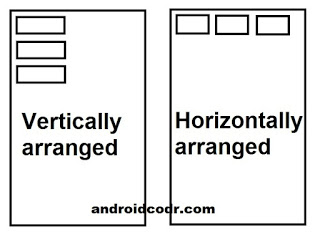
In Linear layout elements are arranged linearly either
horizontal.
vertically

vertically arranged and element in blue layout is horizontally arranged.
Layout. I added package path

layout (vertical)

android:orientation=“vertical”
android:layout_width=“match_parent”
android:layout_height=“match_parent”
android:layout_below=“@+id/textView”
android:layout_alignParentLeft=“true”
android:layout_alignParentStart=“true”> </LinearLayout>

vertical layout buttons will be added one below another.

android:layout_width=“match_parent”
android:layout_height=“wrap_content”
android:id=“@+id/button1”
android:layout_margin=“5dp” />

added.

manner.

Width wrap content


linear layout to show blog post title, date, author and post image.

encoding=“utf-8”?>
<RelativeLayout
xmlns:android=“http://schemas.android.com/apk/res/android”
xmlns:tools=“http://schemas.android.com/tools”
android:id=“@+id/activity_main”
android:layout_width=“match_parent”
android:layout_height=“match_parent”
android:paddingBottom=“@dimen/activity_vertical_margin”
android:paddingLeft=“@dimen/activity_horizontal_margin”
android:paddingRight=“@dimen/activity_horizontal_margin”
android:paddingTop=“@dimen/activity_vertical_margin”
tools:context=“com.androidcodr.linearlayout.MainActivity”> <TextView
android:layout_width=“wrap_content”
android:layout_height=“wrap_content”
android:id=“@+id/textView”
android:text=“Linear Layout” /><LinearLayout
android:orientation=“vertical”
android:layout_width=“match_parent”
android:layout_height=“match_parent”
android:layout_below=“@+id/textView”
android:layout_alignParentLeft=“true”
android:layout_alignParentStart=“true”><TextView
android:text=“These Buttons are vertically arranged”
android:layout_width=“match_parent”
android:layout_height=“wrap_content”
android:id=“@+id/textView2” /><LinearLayout
android:orientation=“vertical”
android:layout_width=“match_parent”
android:layout_height=“wrap_content”
android:layout_margin=“5dp”>
<Button
android:text=“Button”
android:layout_width=“match_parent”
android:layout_height=“wrap_content”
android:id=“@+id/button2”
android:layout_margin=“5dp” />
<Button
android:text=“Button”
android:layout_width=“match_parent”
android:layout_height=“wrap_content”
android:id=“@+id/button”
android:layout_margin=“5dp” />
<Button
android:text=“Button”
android:layout_width=“match_parent”
android:layout_height=“wrap_content”
android:id=“@+id/button3”
android:layout_margin=“5dp” />
</LinearLayout>
<TextView
android:text=“These buttons are horizontally arranged”
android:layout_width=“match_parent”
android:layout_height=“wrap_content”
android:id=“@+id/textView3” />
<LinearLayout
android:orientation=“horizontal”
android:layout_width=“match_parent”
android:layout_height=“match_parent”
android:layout_margin=“5dp”>
<Button
android:text=“Button”
android:layout_width=“wrap_content”
android:layout_height=“wrap_content”
android:id=“@+id/button4”
android:layout_margin=“5dp” />
<Button
android:text=“Button”
android:layout_width=“wrap_content”
android:layout_height=“wrap_content”
android:id=“@+id/butto5”
android:layout_margin=“5dp” />
<Button
android:text=“Button”
android:layout_width=“wrap_content”
android:layout_height=“wrap_content”
android:id=“@+id/button6”
android:layout_margin=“5dp” />
</LinearLayout>
</LinearLayout>
</RelativeLayout>