You have seen list of element in any mobile app where user scroll through list and select item from list.
In this post we will see how to use ListView.
How to select item from list.
Lets get started.
1. open android studio
2. create a new project
3. Set application name Simple ListView
4. I used package path as com.androidcodr.listview click next.
5. On this screen set minimum sdk API 16 click next.
6. Add empty activity. click next.
7. keep Activity name as MainActivity click finish. wait till project load completely.
8. Goto activity_main.xml
9. if you are having constrainLayout change it to RelativeLayout.
Just replace android.support.constraint.ConstraintLayout with RelativeLayout
10. change Hello world textview property as follows
    <TextView
        android:id="@+id/textView"
        android:layout_width="match_parent"
        android:layout_height="wrap_content"
        android:text="ListView Example"
        android:gravity="center_horizontal"
        android:layout_alignParentTop="true" />
11. now drag n drop listview from palette below the textview.
set its property as follows.
  <ListView
        android:layout_width="match_parent"
        android:layout_height="match_parent"
        android:layout_below="@+id/textView"
        android:id="@+id/listview" />
12. now goto java file MainActivity
Declare ListView
ListView listViewSocial;
13. now in OnCreate method.
initialize listview.
listViewSocial = (ListView) findViewById(R.id.listview);
14. now we will define a String array which containing social sites/apps.
String[] companies = new String[]{"Facebook", "Whatsapp", "YouTube", "Instagram", "Twitter", "Google+", "LinkedIn", "Pinterest", "Tumblr", "Flickr"};
15. now we need adapter which will binds our string array to listview.
ListAdapter adapter = new ArrayAdapter<String>(this, android.R.layout.simple_list_item_1, companies);
16. in constructor pass context this as first parameter.
17. this is by default layout for listview with single elements.
android.R.layout.simple_list_item_1 as second parameter.
we will see how to use custom layout for listview in next posts.
18. pass String array as third element.
19. now use setadapter method to bind this adapter to list.
listViewSocial.setAdapter(adapter);
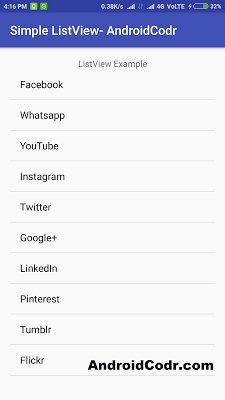
20. Our list is ready you can build project and run.
see out list of social sites/app is now visible.
 |
| Android ListView example |
wait if you click on any element nothing will happen.
lest see how to get selected item on click.
21. use setOnItemClickListener for listview.
as follows.
   listViewSocial.setOnItemClickListener(new OnItemClickListener() {

            @Override
            public void onItemClick(AdapterView<?> l, View v, int position, long id) {

            }
        });
22. It will override onItemClick from
android.widget.AdapterView.OnItemClickListener;
String selected = l.getItemAtPosition(position).toString();
here we stored adapterview .item at position in selected string variable.
23. use toast to display this selected item to user.
Toast.makeText(MainActivity.this, selected, Toast.LENGTH_SHORT).show();
24. again build and run project.
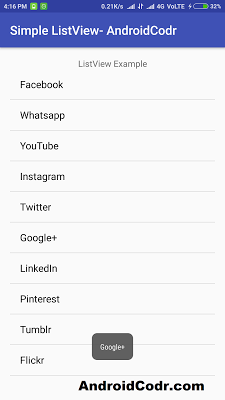
now you can click on any item
a toast message is now showing selected item name.
 |
| Android ListView example |
Here is full code of activity_main.xml
<?xml version="1.0" encoding="utf-8"?>
<RelativeLayout xmlns:android="http://schemas.android.com/apk/res/android"
    xmlns:tools="http://schemas.android.com/tools"
    android:id="@+id/activity_main"
    android:layout_width="match_parent"
    android:layout_height="match_parent"
    android:paddingBottom="@dimen/activity_vertical_margin"
    android:paddingLeft="@dimen/activity_horizontal_margin"
    android:paddingRight="@dimen/activity_horizontal_margin"
    android:paddingTop="@dimen/activity_vertical_margin"
    tools:context="com.androidcodr.listview.MainActivity">

    <TextView
        android:id="@+id/textView"
        android:layout_width="match_parent"
        android:layout_height="wrap_content"
        android:text="ListView Example"
        android:gravity="center_horizontal"
        android:layout_alignParentTop="true" />

    <ListView
        android:layout_width="match_parent"
        android:layout_height="match_parent"
        android:layout_below="@+id/textView"
        android:id="@+id/listview" />


</RelativeLayout>
Here is Full code of MainActivity.java
package com.androidcodr.listview;

import android.os.Bundle;
import android.support.v7.app.AppCompatActivity;
import android.view.View;
import android.widget.AdapterView;
import android.widget.AdapterView.OnItemClickListener;
import android.widget.ArrayAdapter;
import android.widget.ListAdapter;
import android.widget.ListView;
import android.widget.Toast;

public class MainActivity extends AppCompatActivity {

    ListView listViewSocial;

    @Override
    protected void onCreate(Bundle savedInstanceState) {
        super.onCreate(savedInstanceState);
        setContentView(R.layout.activity_main);
        listViewSocial = (ListView) findViewById(R.id.listview);

        String[] companies = new String[]{"Facebook", "Whatsapp", "YouTube", "Instagram", "Twitter", "Google+", "LinkedIn", "Pinterest", "Tumblr", "Flickr"};
        ListAdapter adapter = new ArrayAdapter<String>(this, android.R.layout.simple_list_item_1, companies);

        listViewSocial.setAdapter(adapter);

        listViewSocial.setOnItemClickListener(new OnItemClickListener() {

            @Override
            public void onItemClick(AdapterView<?> l, View v, int position, long id) {
                String selected = l.getItemAtPosition(position).toString();
                Toast.makeText(MainActivity.this, selected, Toast.LENGTH_SHORT).show();
            }
        });

    }
}
Thanks.
If you Like post share with your Friends.
Subscribe us.
Follow us on Facebook Twitter and Google+
